
A grow tent gives you a controlled space to grow plants in any season. You decide how much light they get, and you can steer temperature, humidity, and the rest. Holding those conditions steady is the hard part, and ventilation is the piece people most often skip over during setup and daily use.
You can have a good light, plenty of room, and a sensible layout, and still end up with poor airflow. Stale air, damp conditions, hot spots, and strong smells are the usual giveaways. They tend to creep in slowly, so you may not notice anything until the plants start to look off.
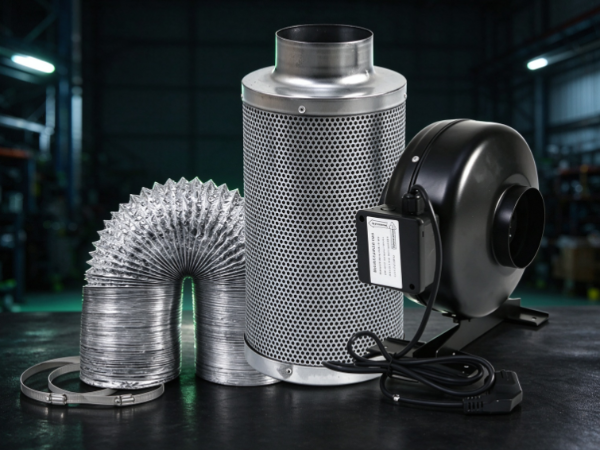
Grow Tent with Ventilatio isn't just pushing air in and out. It's a balance between fresh air coming in, exhaust air going out, and circulation inside the tent. Each has its own job, and a fault in one can drag down the whole space.
Once you know the common problems, it's much easier to trace poor airflow to its source and fix it.
A grow tent is a closed box. Outdoors, wind keeps the air moving. Inside a tent, air exchange depends almost entirely on the ventilation design and the equipment you put in it.
Plants keep changing the air around them as they grow. They take in carbon dioxide and give off moisture. Lights and other gear add heat on top of that. Without decent airflow, the conditions inside slowly drift.
Good ventilation covers several needs:
These jobs overlap but can't stand in for each other. An exhaust fan pulls out warm air, while a circulation fan only moves the air that's already there. Neither does the other's work.
A well-planned system handles air exchange and internal movement together. If one part is missing or badly placed, trouble can appear even when everything else seems to run fine.
This is a frequent problem in sealed growing spaces. It happens when too little air can enter to replace what the exhaust is pulling out.
Many growers put all their attention on the exhaust fan, since it removes the warm, damp air. But air needs a clear path in as well. If intake openings are blocked, squeezed, or badly placed, the exhaust can't keep up a steady flow.
A few things commonly cause it.
Tents usually have mesh vents, sleeves, and adjustable openings so you can set up intake to suit your gear. Walls, stored items, or folds of fabric can easily end up covering them.
A tent pushed up against a wall may have its lower vents starved of air. That weakens passive intake and changes the whole airflow pattern.
Where the intake sits matters too. If fresh air comes in right next to the exhaust outlet, it can leave again before it ever reaches the plants. That's a short, wasteful loop.
Open vents don't help if the room itself is stuffy. When the room is warm, humid, or has little air movement, the tent has nothing good to draw in.
| Common Intake Problem | Possible Effect | Practical Adjustment |
|---|---|---|
| Blocked air openings | Restricted fresh air supply | Keep ventilation ports clear |
| Poor intake location | Uneven air distribution | Review the position of intake openings |
| Limited surrounding airflow | Less effective air exchange | Improve ventilation in the surrounding room |
| Folded or compressed vent sleeves | Reduced airflow access | Keep ventilation paths unobstructed |
If the exhaust fan is running but the tent still feels stuffy, look at the intake first. The fan may be fine. What's missing could be a path for replacement air.
Exhaust ventilation takes warm, humid, stale air out of the tent. When it falters, those conditions build up.
Heat is the obvious sign. Grow lights and electrical gear warm the space as they run. If that air can't get out, the temperature climbs, and plants near the light or high in the tent feel it most.
Moisture is the other big one. Water evaporates from the growing medium and surfaces, and the plants release more. If that humid air stays put, the tent gets steadily damper.
Damp air invites mold and other moisture problems. It can also affect leaves, nearby materials, and the tent interior.
A few things commonly hurt exhaust performance:
The exhaust also has to work with the room around it. Pulling air out is only half the job. That air needs somewhere to go, and replacement air has to be available.
If temperature or humidity problems won't go away, check the whole exhaust route before buying a new fan.
Intake and exhaust can both work well and some parts of the tent can still sit in dead air. This uneven airflow is hard to spot because the overall readings may look fine.
Layout has a big effect on where the air goes. Plants, shelves, pots, lights, and accessories all get in the way. The more crowded the tent, the harder it is for air to get through.
Dense foliage, for example, can block flow between plants. Air may move freely near the door while the lower leaves or the area behind a big pot stay still. You end up with different temperature and moisture levels in different corners.
Circulation fan placement matters as well. A fan pointed at one spot gives strong movement there and little elsewhere. Adding more fans doesn't automatically help. Where they sit and which way they point has to suit the layout.
To find uneven airflow, look around the whole tent and not just near the entrance. Signs include:
Circulation fans should give gentle, spread-out movement. Avoid a constant harsh blast aimed straight at the plants.
You may also need to adjust the layout now and then. Moving equipment, spacing out pots, or turning a fan can restore airflow without redoing the whole system.
Humidity and ventilation are closely linked, but airflow isn't the only thing that sets humidity. How much moisture the plants release, how warm the room is, and the overall setup all play a part.
If moisture enters the air faster than ventilation can remove it, humidity creeps up. That's most noticeable in a closed tent with dense plants, wet media, or poor air exchange.
High humidity brings several practical problems.
Water vapor condenses on cooler surfaces such as tent walls, ducts, and nearby equipment. Constant condensation wears on the enclosure and adds to maintenance work.
Damp conditions encourage fungal growth. Leaves that stay wet for long periods are also more open to certain plant diseases.
Too much humidity makes steady growing conditions harder to hold. Even if the temperature looks fine, moisture levels can shift as plants grow and release more water.
Electrical parts, metal fittings, and fabric surfaces need more attention when moisture stays high.
| Humidity-Related Issue | Possible Cause | Ventilation Consideration |
|---|---|---|
| Persistent dampness | Limited air exchange | Review intake and exhaust arrangements |
| Condensation on tent walls | Moist air meeting cooler surfaces | Improve moisture removal and inspect room conditions |
| Mold around plant areas | Stagnant, humid air | Improve internal circulation |
| Damp ventilation components | Moisture accumulation | Check airflow paths and surrounding conditions |
Keep in mind that not all excess moisture is a ventilation fault. The system may be working, yet heavy watering, wet materials, or a humid room can still keep conditions too damp.
Measure humidity in several spots. A single reading beside the exhaust fan won't tell you the full story.
Air pressure in the tent depends on how incoming and outgoing airflow compare. If the exhaust pulls out air faster than fresh air arrives, the tent develops negative pressure.
Some negative pressure is normal and even useful, since it keeps odors from leaking out through small gaps. Too much, though, usually means the intake is restricted or the setup needs adjusting.
The visible sign is tent fabric sucked inward. Soft-sided tents often flex a little when the exhaust runs. If the walls are badly crushed in, the fan is probably drawing air through too few openings.
That can cause trouble:
Positive pressure can happen too, when more air comes in than goes out. Then air leaks out through seams, zippers, and other small gaps.
Neither condition should be judged alone. The right balance depends on the tent structure, filtration, surroundings, and the airflow direction you intend.
Look at the fabric, the intake, and the exhaust together. That shows whether the imbalance comes from blocked airflow or from the way the equipment is arranged.
Noise and odor affect daily use of a tent. They don't always mean growing conditions are bad, but they often point to a problem with the equipment or the airflow.
Noise usually comes from fans, ducts, filters, and how they're mounted. A fan fixed against a rigid frame can pass vibration into the whole tent. Loose duct joints rattle when air moves through.
Restricted airflow adds noise too. Air forced through a narrow or blocked opening gets louder and less steady.
Some practical checks:
Odor has a different cause. Plants and growing materials give off smells, especially in a closed space. If the exhaust isn't connected to a proper filter, those smells spread into the room.
Carbon filters are the usual fix. How well they work depends on correct installation, enough airflow, and regular upkeep.
A filter in the wrong spot, a loose duct joint, or a damaged part can let air bypass the filter entirely. A filter at the end of its life also stops controlling odor.
Check the whole airflow route instead of blaming the filter alone. Odor control depends on the fan, ducting, filter, and tent openings working together.
Many ventilation problems start at the buying or setup stage, or from neglect later. A tent may have lots of vents, but they only help if they suit the way you plan to grow.
When assessing a ventilated tent, think about how its structure matches the equipment you intend to use.
The tent should have suitable ports for intake, exhaust ducts, and other accessories. Adjustable openings give you room to change things when equipment moves.
Port location matters. The layout should let air enter and leave without forcing it into an overly short path.
The frame must support the ventilation gear in regular use, and the fabric should fit snugly around sleeves and access openings.
Loose connections or ill-fitting openings cause air leaks. These upset airflow direction and make odor control harder.
There should be room for plants, lights, fans, filters, and accessories without creating obstacles.
A crowded tent can choke airflow even if its ventilation design is good. Plan the layout before you install anything.
Ventilation gear needs regular checks. Filters collect particles, ducts get dirty, and fan connections work loose.
A practical tent lets you reach these parts without taking the whole setup apart.
Use this checklist for routine inspections.
| Inspection Area | What to Check | Why It Matters |
|---|---|---|
| Air intake | Blockages and opening conditions | Supports fresh air entry |
| Exhaust fan | Operation and unusual noise | Helps identify airflow problems |
| Ducting | Bends, loose connections, and dirt | Maintains a clear exhaust path |
| Circulation fans | Position and direction | Reduces stagnant air areas |
| Carbon filter | Condition and installation | Supports odor management |
| Tent fabric | Gaps, damage, and deformation | Helps maintain the intended airflow arrangement |
| Interior layout | Crowded plants and blocked spaces | Allows air to move around the growing area |
Regular checks beat waiting for problems to show. As plants grow and equipment moves, the original airflow pattern may stop fitting the tent.
A setup that works well early on may need changes later. Plant size, foliage density, moisture output, and equipment placement all shift the conditions inside. Keep those changes in mind and you'll be able to hold a stable growing environment without leaning on the ventilation gear alone.

 英语
 俄语
 德语
 西班牙语
 法语